首先,所有东西都在这里:https://github.com/theme-next/hexo-theme-next
准备环境
Git: https://git-scm.com/download/win
Node.js: https://nodejs.org/zh-cn/
#Nodejs推荐安装LTS长期支持版
确认Git和Node版本
git version
node -v
npm -v
教程基于环境
git:v2.2.5.0 for windows
node v12.16.0
npm v6.13.4
安装hexo-cli
npm install hexo-cli -g
确认Hexo安装版本
hexo -v
视网络环境不同,下载安装速度不同,国内网络一般过程比较久
设置PowerShell执行策略允许签名脚本运行
出于安全目的,Win10默认不允许运行外部脚本,需要设置策略允许。
Set-ExecutionPolicy RemoteSigned
初始化Hexo
hexo init
根据网络环境不同,初始化速度不同。可能会出现依赖缺失,根据提示执行 npm install 即可
配置Hexo
用文本软件编辑blog/_config.yml,详细介绍参考https://hexo.io/docs/configuration.html
主要配置
#网站设置

#标题
title: Hexo
#副标题
subtitle: ''
#介绍, 可用于SEO
description: ''
#关键词, 可用于SEO, 逗号隔开
keywords:
#作者
author: John Doe
#语言
language: zh
#时间区域
timezone: 'Asia/Shanghai'

#网站链接
url: http://yoursite.com

#部署
deploy:
  type: 'git'
  repo: https://github.com/yourusername/yourusername.github.io.git
  branch: master
生成博客内容
hexo g 或者 hexo generate
启动Hexo (临时Server)
hexo s 或者 hexo server
默认访问地址为localhost:4000,可通过局域网访问
主题
基于Theme Next Gemini
主题安装
cd blog
mkdir themes/next
git clone https://github.com/theme-next/hexo-theme-next themes/next
git clone完成后编辑blogs/_config.yml
theme: next配置Next主题
编辑themes/next/_config.yml
主要配置
#语言
#Next默认英文语言, 需要手动加入该行, 在themes/next/languages内查看支持语言
language: zh-CN

#网站图标
favicon:

#页面脚部
footer:

#主题组合类型
scheme: Gemini

#菜单设置
menu:
menu_settings:

#侧边栏
sidebar:

#头像
avatar:

#社交媒体
social:                #社交媒体永久链接
social_icons:            #社交媒体图标

#文章设置
post_meta:            #文章元素设置
tag_icon:            #标签tag图标
reward_settings:         #打赏设置
reward:                #打赏图片

#其他主题设定
text_align:            #文字排版
codeblock:            #代码块样式设置
back2top:            #返回顶部按钮
reading_progress:        #阅读进度
bookmark:            #书签
github_banner:            #页面右上角Github角幅

#搜索服务
local_search:        #需要安装https://github.com/theme-next/hexo-generator-searchdb

#动画效果
motion:            #网站动态效果
pace:            #顶部进度条, 需要安装https://github.com/theme-next/theme-next-pace
three:            #JS 3D库, 需要安装https://github.com/theme-next/theme-next-three
canvas_nest:        #https://github.com/theme-next/theme-next-canvas-nest
canvas_ribbon:        #https://github.com/theme-next/theme-next-canvas-ribbon
安装依赖
打开themes/next/config.yml内对应的注释网页,根据提示操作,以搜索功能和pace动画效果为例
cd blog
npm install hexo-generator-searchdb
cd themes/next
git clone https://github.com/theme-next/theme-next-pace source/lib/pace
配置搜索功能 (可选)
编辑blog/_config.yml
#path - file path. By default is search.xml. If the file extension is .json, #the output format will be JSON. Otherwise XML format file will be exported.
#field - the search scope you want to search, you can chose:
#    post (Default) - will only cover all the posts of your blog.
#    page - will only cover all the pages of your blog.
#    all - will cover all the posts and pages of your blog.
#content - whether contains the whole content of each article. If false, the #generated results only cover title and other meta info without mainbody. By #default is true.
#format - the form of the page contents, options are:
#    html (Default) - original html string being minified.
#    striptags - original html string being minified, and remove all the tags.
#    raw - markdown text of each posts or pages.
search:
  path: search.xml
  field: post
  content: true
  format: html
Github托管
#登录 https://github.com
#创建新仓库 New repository
#仓库名指定: yourusername.github.io
配置Github
git config --global user.name "yourusername"
git config --global user.email "youruseremail"
#查看C:\User\yourusername\.ssh是否已有ssh私钥和公钥, id_rsa+id_rsa.pub
#没有则生成ssh-keygen -t rsa -C "xxx@xxx.com"
#在github-settings-SSH and GPG keys添加SSH公钥, 在id_rsa.pub内, 全文复制粘贴id_rsa.pub内容
Hexo部署到Github
cd blog
npm install hexo-deployer-git --save
hexo d
配置Github Pages实现自定义域名访问
前提条件 (以阿里云解析为例)
1.拥有一个自己的域名
2.DNS解析服务
①.进入Pages网页手动修改
访问username.github.io repository的settings,下拉找到"Custom domain",将其配置为自定义域名,比如domain.com或二级域名blog.domain.com
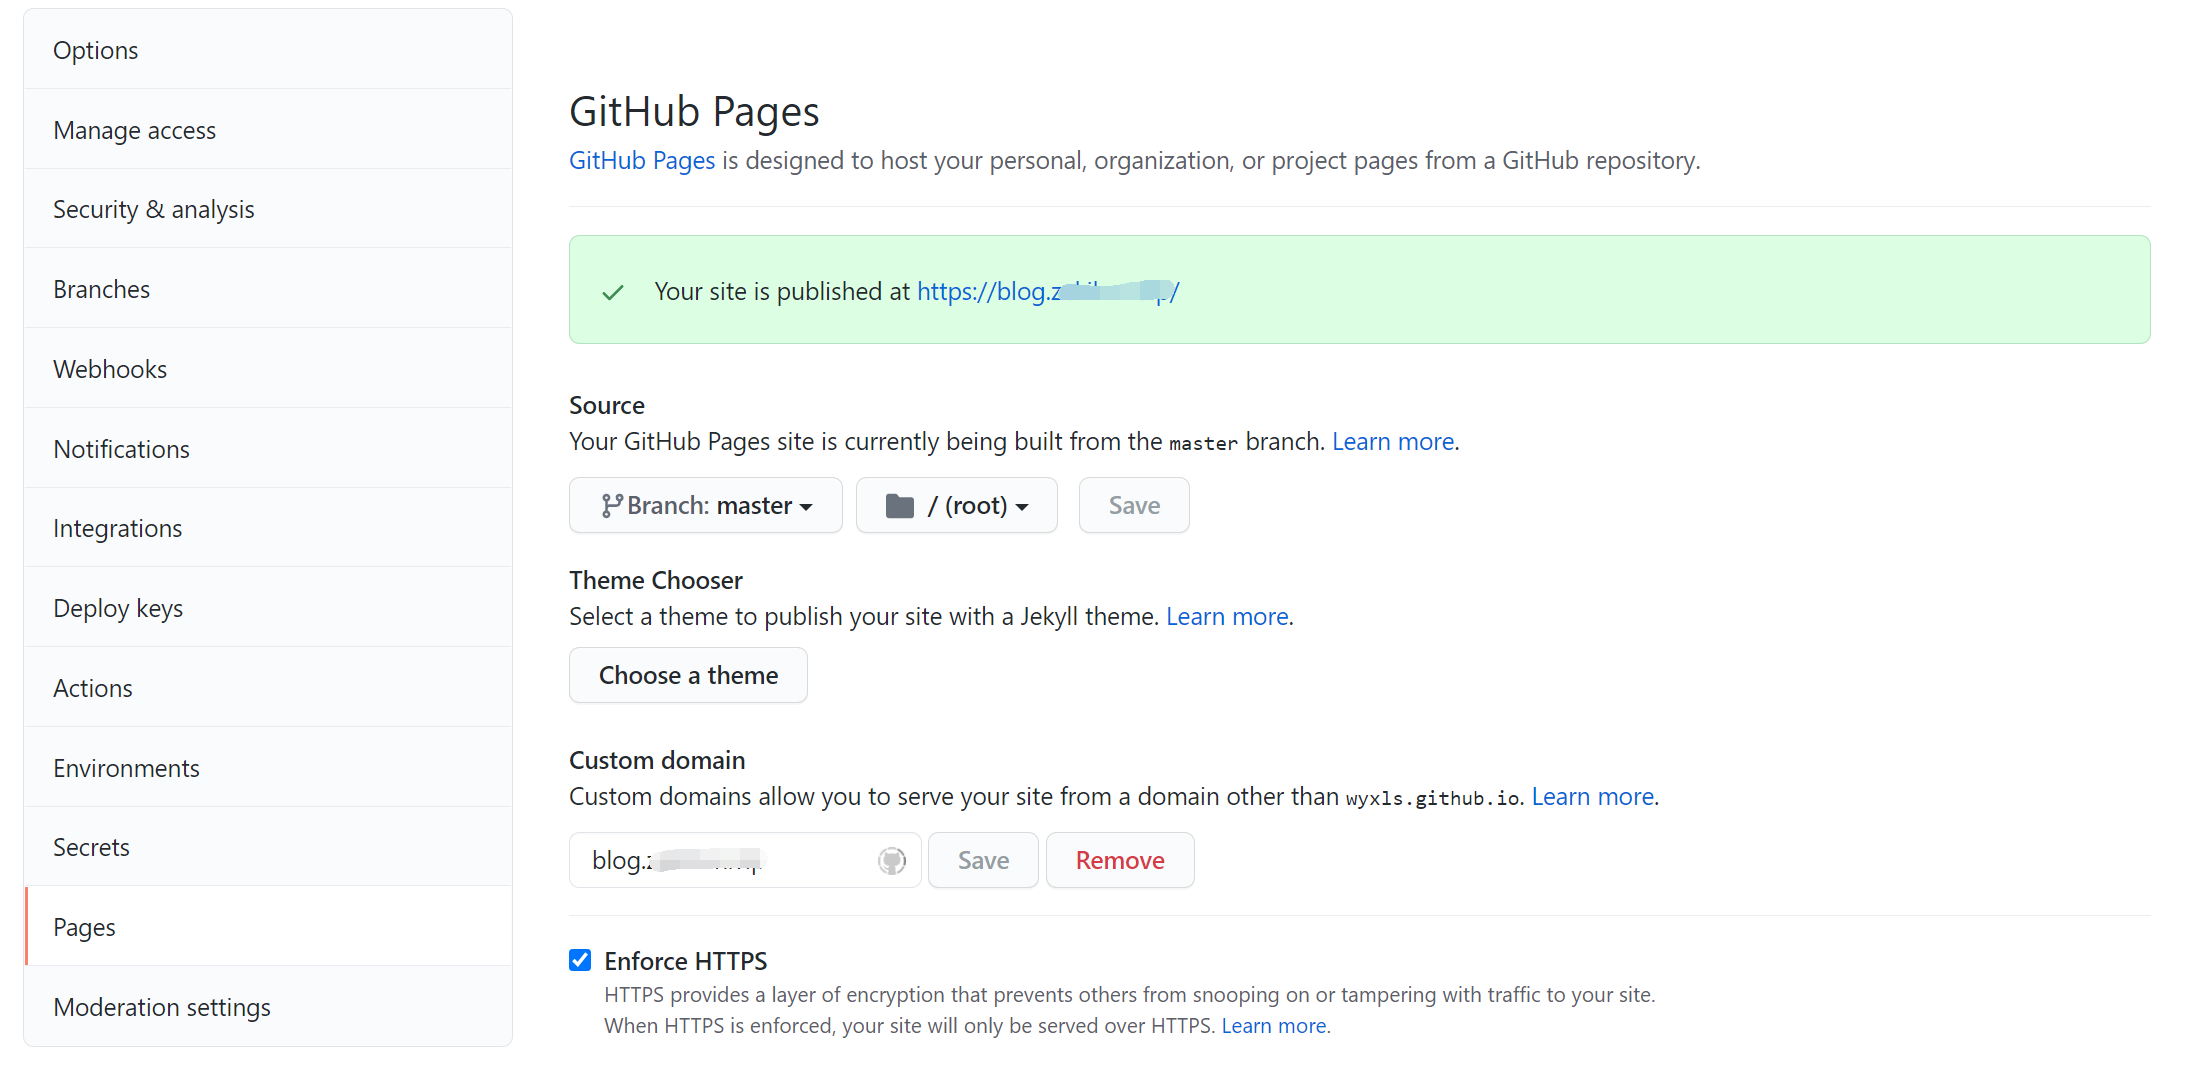
②.部署时指定CNAME
在博客根目录下的source文件夹创建无扩展名的"CNAME"文件,在里面填入域名,部署到Github时就会自动更改GitHub Pages的自定义域名
source/CNAME <-blog.domain.com
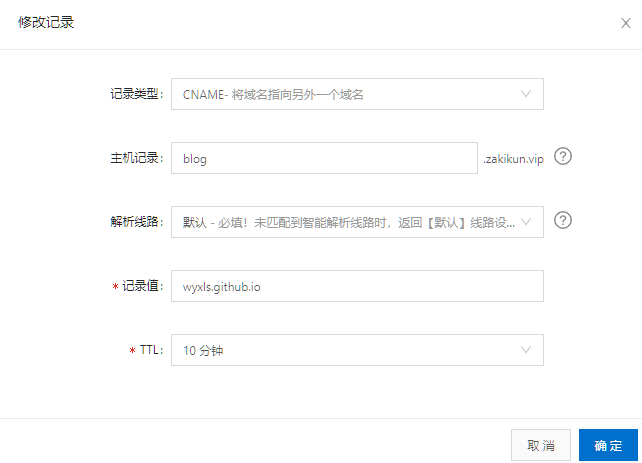
在解析服务中添加CNAME解析
| 记录类型 | 主机记录 | 解析线路(运营商) | 记录值 |
|---|---|---|---|
| CNAME | @ | 默认 | username.github.io |
| CNAME | www | 默认 | username.github.io |
这样就能直接通过 www.domain.com 或 domain.com访问博客
二级域名则直接添加CNAME解析
| 记录类型 | 主机记录 | 解析线路(运营商) | 记录值 |
|---|---|---|---|
| CNAME | blog | 默认 | username.github.io |
版权属于:Zakikun
本文链接:https://blog.zakikun.com/archives/10.html
本文采用 知识共享署名-非商业性使用 4.0 国际许可协议 进行许可。
您可以自由的转载和修改,但请务必注明文章来源并且不可用于商业目的。
